Welcome to Mimer SQL. This document describes how to set-up Mimer SQL on Windows after the installation.
To get the most out of this document, you should be familiar with your Windows environment and know how to use the various Windows system tools.
Licensing Mimer SQL
When you install Mimer SQL, a default development edition license key is installed. This license covers basic usage for development purposes and enables 10 concurrent users.
If you want to use Mimer SQL for any purpose other than development, you must purchase a commercial license. Contact your Mimer SQL distributor, https://www.mimer.com/contact, to purchase the license you require. Your new license key will be sent to you via e-mail. You apply the new license key by double-clicking on the e-mail attachment.
For more information, start the Mimer Administrator, located in the Start menu’s Mimer SQL folder, click the License Key tab and select Help.
Rights and Privileges
On Windows you must belong to the administrators group to set-up Mimer SQL clients and servers.
Documentation
The Mimer SQL Documentation Set, Mimer JDBC Driver Guide, Release Notes, and Mimer Windows specific documentation are available in the Start menu’s Mimer SQL folder, under Mimer SQL Documentation.
 |
The documentation set (i.e. SQL Reference Manual, Programmer’s Manual, System Management Handbook, and User’s Manual) will only be available if you chose to install it when you installed Mimer SQL. |
Useful Links
The Mimer SQL Developer Site contains lots of useful information, like FAQ’s, How-to’s and articles: https://developer.mimer.com
Setting-up a Database Client
If you want to access a Mimer SQL database server (also referred to as a remote database) already installed on your network, all you need to do is set-up a Mimer SQL database client.
You set-up a client using the Mimer Administrator.
-
Start the Mimer Administrator, located in the Start menu’s Mimer SQL folder.
-
Click the
Remotetab and then click theAddbutton. -
In the Remote Database Definition dialog box, enter the database name, the node (computer) where the database server is located and which network protocol to use.
The database name must be the same name used on the remote computer. Ask your system or database administrator if you are unsure of the name.
The node name is the name of the computer as registered in the network. It is usually entered in lower case letters.
The network protocol is usually tcp. You can also use NamedPipes.
Click OK, you are now ready to access the Mimer SQL database from your development tool. An ODBC data source with the same name as the database is created automatically.
Creating Mimer SQL Databases
Creating Mimer SQL databases is easy. All you need to do is:
-
add a database definition for the database
-
create the system databanks
-
set the SYSADM password
-
create a database user
-
start the Mimer SQL database server.
You do this using the Mimer Administrator and a wizard to guide you.
Creating a Database
- Start the Mimer Administrator, located in the Start menu’s Mimer SQL folder.
- In the Mimer Administrator, on the
Localtab, clickAddto create a database. The Local Database Definition dialog box opens. - Enter the name of the database and the directory in which you want to create it. Click
OK. - The Mimer Administrator asks if you want to create system databanks. In the Create Systems dialog box, click
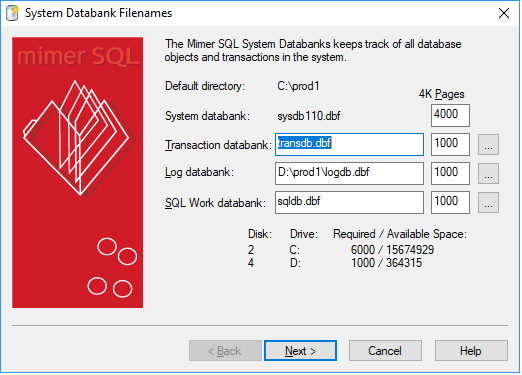
Yes. The following wizard starts:
The example above demonstrates the following important points:
- for databanks in other places than the default directory, the file locations must be specified as absolute paths
- to safeguard against data loss in the event of a hard disk failure, place the log databank, LOGDB, on a separate disk from the other databanks.
- If possible, also place TRANSDB on a separate disk. However, LOGDB and TRANSDB should not be placed on the same disk. If you only have one alternative disk, use it for LOGDB. Mimer SQL examines the available hard disks and suggests how the files should be distributed. (In the above example, C: and D: are on separate hard disks.)

You can use the Disk Administrator in the Administrative Tools menu to check the layout of logical disk partitions (e.g. C:, D:) on the available hard disks. The file sizes are expressed in 4K blocks. The initial sizes are not critical as the files will be automatically extended as required.
Enter the database information and click
Next. - The next step is to specify the password for the system administrator SYSADM. Enter the system administrator's password, and confirm it. Click
Next.
Keep the SYSADM password secure, as SYSADM can alter passwords for Mimer SQL users that he/she creates. If you lose the SYSADM password, it cannot be retrieved from your Mimer SQL system.
When the system databank creation is complete, the wizard asks you what you want to do next. Select both options available and click
Next. - Continue with the wizard to create a development user and start the database server.
After completing the wizard, you can access your database directly from your favorite ODBC tool.
If you want to access this database from another computer in the network, you must install and set-up a database client on the other computer. See Setting-up a Database Client.
Starting and Stopping Database Servers
How you start and stop Mimer SQL database servers depends on the Windows operating system you are using.
However, on all Windows platforms supported by Mimer SQL, you can control local database servers using the Mimer Administrator.
Go to the Start menu’s Mimer SQL folder and select Mimer Administrator, Mimer Administrator starts.
Click the Local tab and right-click on the database name. A pop-up menu enables you to start and stop the database server.
Starting and Stopping
You can start and stop database servers, and enable or disable logins using the Mimer Controller, located in the Start menu’s Mimer SQL folder. You can control both remote and local databases using the Mimer Controller.
The operating system equivalent of the Mimer Controller is the Services desktop app in the Start menu. You can use Services to start and stop Mimer SQL databases.
Autostart
By default, Mimer SQL database servers are created with the startup setting set to Autostart. Mimer SQL database servers will start automatically whenever the machine reboots.
You can view and change the Autostart setting using the Mimer Administrator or Windows Services.
Logging Database Events
Mimer SQL writes events to the Windows event log. Use the Event Viewer, located under Administrative Tools, to examine the event log.
The source for Mimer SQL events is the name of the database service they relate to, and they are logged in the Application log.
Setting Up and Running DbVisualizer
DbVisualizer is a graphical front-end used to view and manage your database objects. It is started from the DbVisualizer shortcut in the Start menu’s Mimer SQL folder, or from the Tools menu in the Mimer Administrator.
The first time DbVisualizer is started you may need to install Java on you computer. Once Java is installed DbVisualizer is started. The very first time DbVisualizer is started two operations are automatically initiated:
First the New Connection Wizard is started. This wizard will help you set up a connection to you Mimer SQL database:
- You are first prompted for a name of the connection. A common naming scheme is to use the database name followed by the user name in parenthesis. For example: dbsql (MIMER_STORE)
- In the second step you select database driver. Select Mimer from the drop down list.
- In the third step you fill in the database name, user name, and password used when accessing the Mimer SQL server. Enter the name of the database you want to connect to. If you have set up the Mimer SQL Example database, you can enter user name MIMER_STORE and password GoodiesRUs (if you have used the default password). If your database is on another computer remember to change the Server field to the name of the computer. Before proceeding, make sure you test that your connection is working properly.
- You have now completed the wizard and can explore the various objects in you database by selecting them in the tree view to the left. Note that you can modify existing object and create new ones by right-clicking on the objects or object types.
The second that happens when DbVisualizer is invoked for the first time is that the Driver Finder will locate the Mimer SQL JDBC Driver. Unless errors have occurred, this dialog can simply be closed.
Running Mimer BSQL and Other Utilities
In order to run most of the Mimer SQL utilities from a command prompt window, you must specify which database to access. You can do this in different ways:
- Enter the database name on the command line, e.g. BSQL database_name
- Use the environment variable MIMER_DATABASE, e.g. SET MIMER_DATABASE=database_name
- Use an ODBC default data source. Specify
Defaultas the data source name in the Mimer Administrator.
The order of the three methods is significant as the previous methods override the later ones. For example, specifying the database on the command line overrides the setting of the MIMER_DATABASE environment variable.
The Developer and Example Environments
If, when installing Mimer SQL, you chose to install the development and sample files, you can choose to set-up a development environment and an example environment.
To install the environments:
- Start Mimer Administrator, located in the Mimer SQL program group.
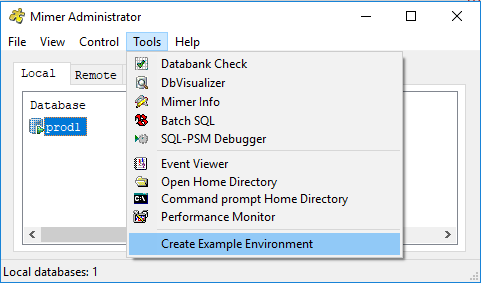
- Select the
Localtab, and open theToolsmenu, for example:
- Select
Create Example Environment, the following dialog box opens:
- Select the environment(s) you want to create and click
Next. A wizard will guide you through the necessary steps.
Accessing the Example Environment
To access the example environment, you can use:
- DbVisualizer or Mimer BSQL, both available in the Mimer SQL program group
- Any ODBC or JDBC based SQL tool
Building the Development Environment
 |
You must have the Microsoft Visual Studio or equivalent development kit installed. |
To build the environment:
- Open a command prompt window.
- Change the current directory to the development kit home directory, under the installation directory, e.g. C:\Program Files\Mimer SQL 11.0\DEV
- Enter the following commands:
Build commands Copy CodeNMAKE /F makefile.mak DSQL OSQL NMAKE /F makefile.mak clean
You must have a path which includes the NMAKE program.
The sample programs created accept SQL statements and display selected results.
 |
To build and run the OSQL (ODBC sample program) you must have defined a data source. |
You can use the makefile as a starting point for writing your own makefiles.
An alternative to the above steps is to open the makefile in Microsoft Visual Studio and then compile the programs.
Packaging Mimer SQL with a Windows Application
If you want to package your application with Mimer SQL, you should read the Mimer SQL Packaging Guide for Windows. It can be found at https://developer.mimer.com/documentation/.